# Setup and Edit Lead Form

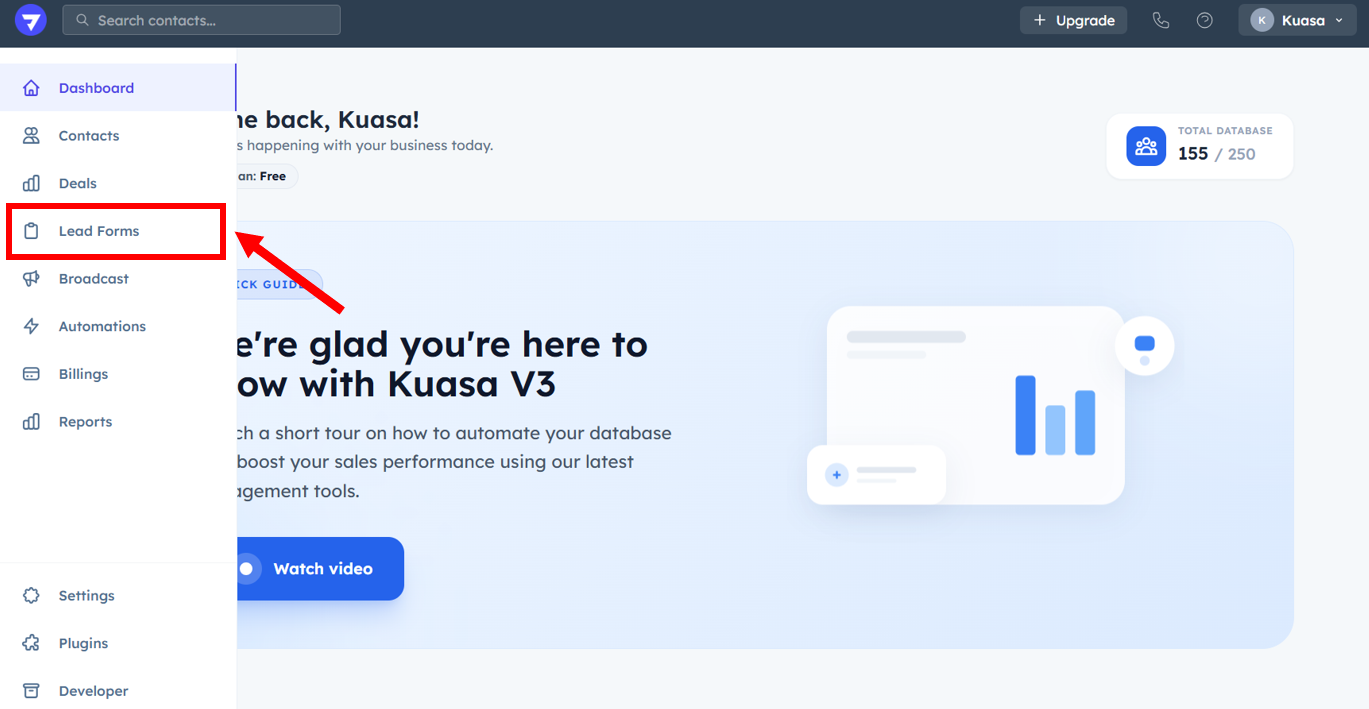
1. Click **Lead Forms**.

<figure><img src="https://837980260-files.gitbook.io/~/files/v0/b/gitbook-x-prod.appspot.com/o/spaces%2F-MZ6_HQ5Xb4p3DicjdT3%2Fuploads%2FxYkm090WmFGDgYhgOqlt%2Fimage.png?alt=media&#x26;token=89474ce7-d57e-4064-9a27-87e804b38e2e" alt=""><figcaption></figcaption></figure>

2. Click the **Edit** button at the right side under the **Action** part.3.&#x20;
3. Setup all the parts below:
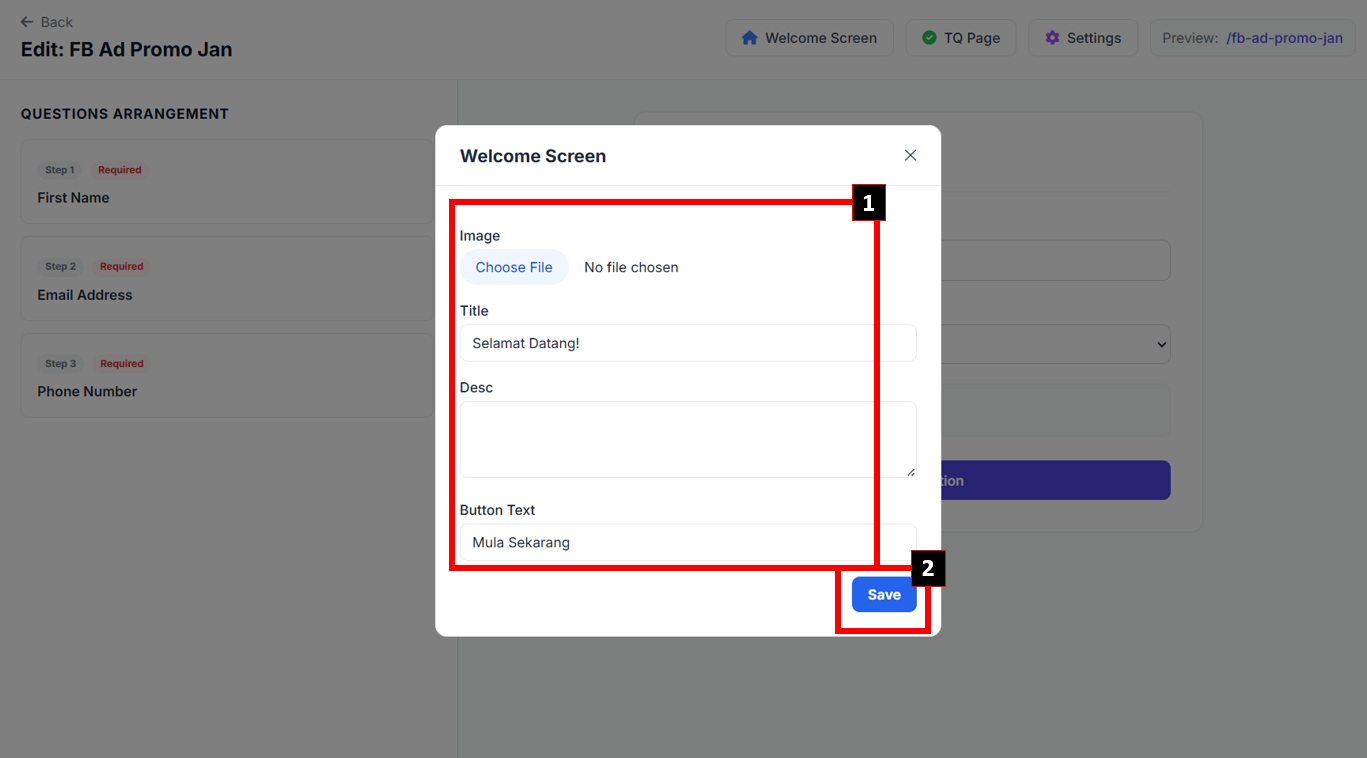
i. Welcome Screen

1. You may setup the details below:

**Image**: You can add an image for the Lead Form poster

**Title**: Fill your Lead Form title

**Desc**: Write your Lead Form description

**Button Text**: Put the label for the **Start Button**

2. Click **Save** button.
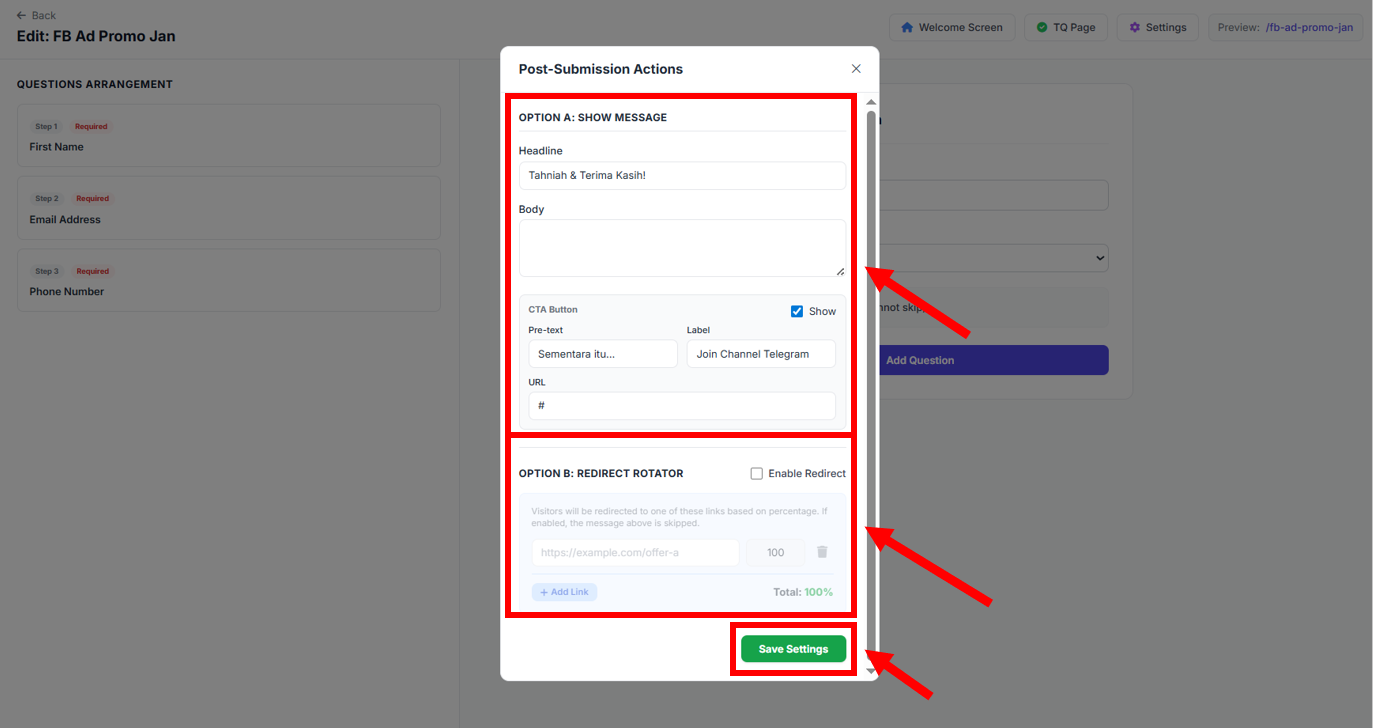
<figure><img src="https://837980260-files.gitbook.io/~/files/v0/b/gitbook-x-prod.appspot.com/o/spaces%2F-MZ6_HQ5Xb4p3DicjdT3%2Fuploads%2F1XzoCM1egyXBwDnTBsNb%2Fimage.png?alt=media&#x26;token=b20d6d3f-46a7-4295-a2bf-49b6a082a75d" alt=""><figcaption></figcaption></figure>

#### ii. TQ Page

1. You may setup the details below:

**Headline**: Put the Headline for your Thank you page.

**Body**: Write the sentence for your Thank you page.

**CTA Button** (Optional): You can add the CTA Button in the Thank You page.

**Redirect Rotator** (Optional): You can setup the redirect page after the Thank You page and set the percentage for each redirect link.

2. After done set all the details, click **Save Settings**.
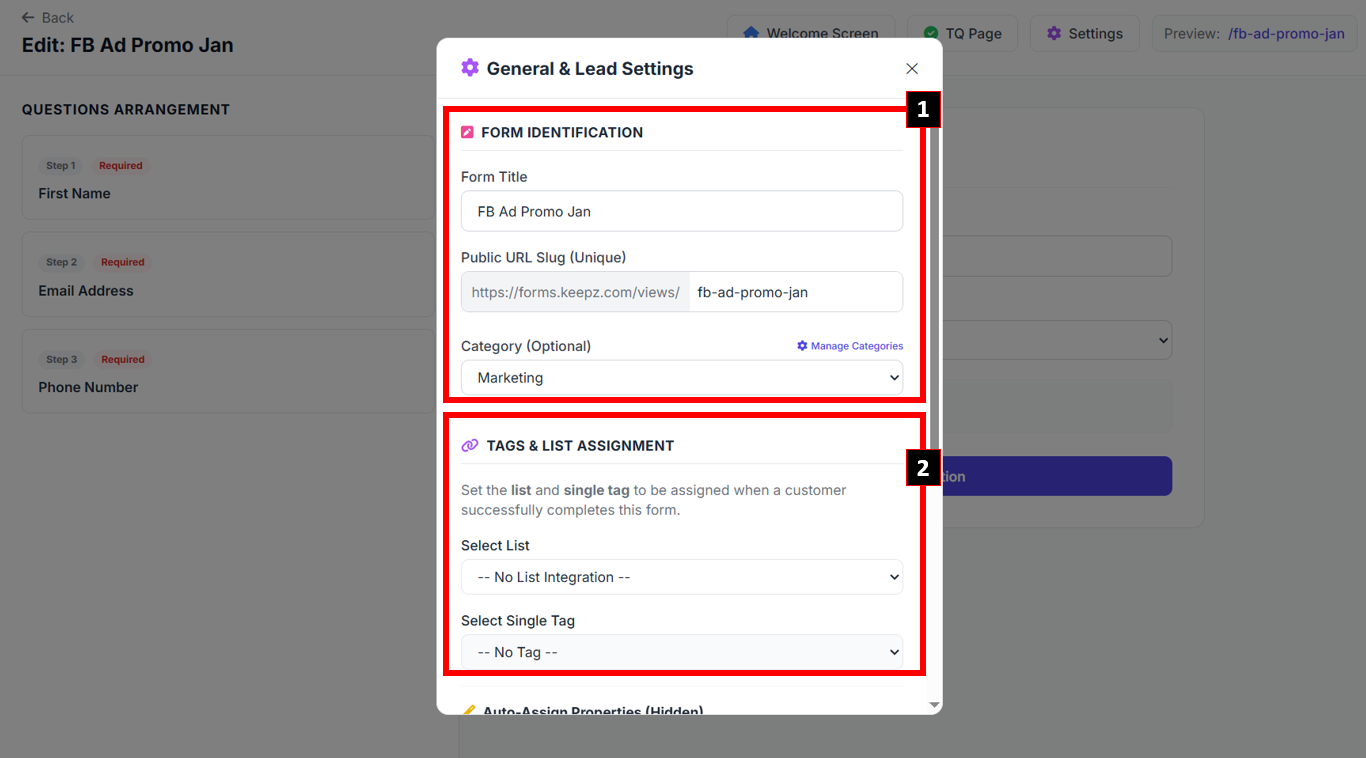
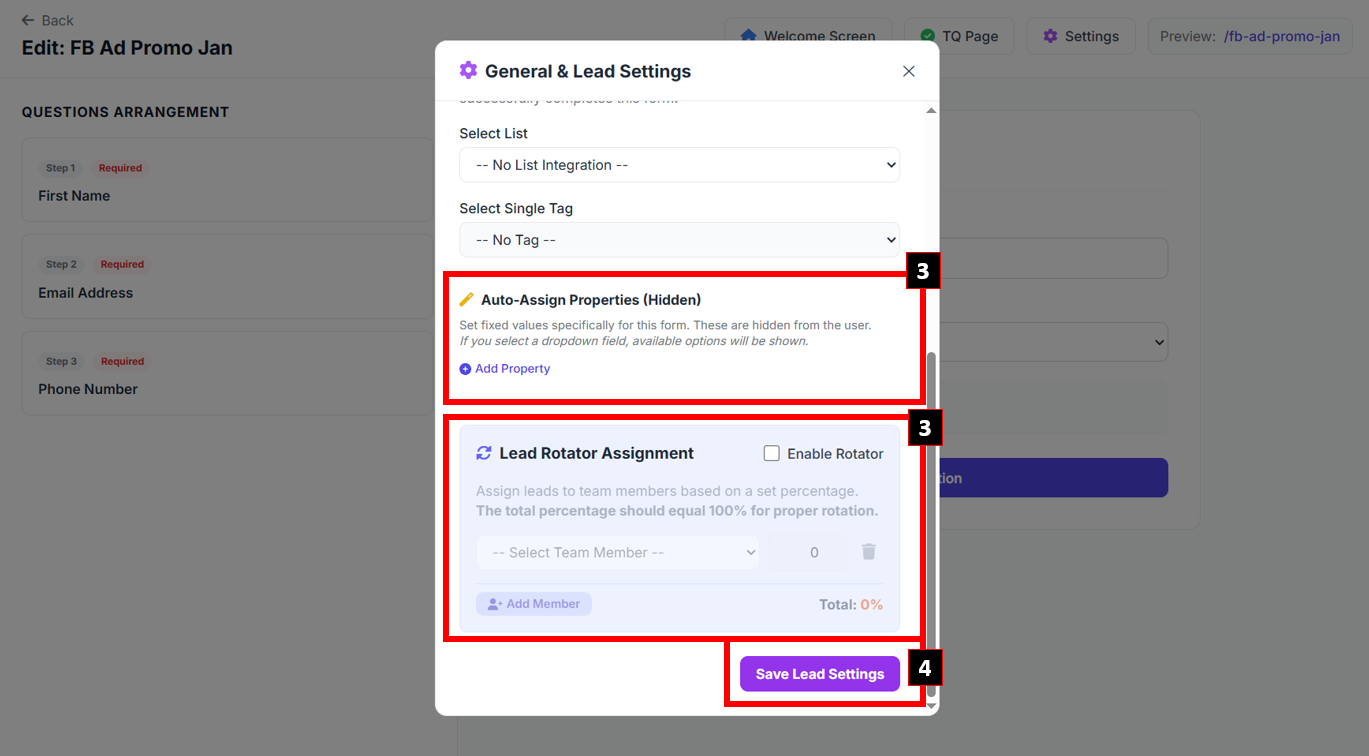
<figure><img src="https://837980260-files.gitbook.io/~/files/v0/b/gitbook-x-prod.appspot.com/o/spaces%2F-MZ6_HQ5Xb4p3DicjdT3%2Fuploads%2F304tfqh0GkmHbu8UqrYY%2Fimage.png?alt=media&#x26;token=68b8671c-e8d3-4de0-b3c9-8bf58b4a4826" alt=""><figcaption></figcaption></figure>

#### iii. Settings

1. You can setup the General & Lead Settings:

**Form Identification**: You can edit the **Form title**, **Public URL Slug**, and the **Category** of the Lead Form.

<figure><img src="https://837980260-files.gitbook.io/~/files/v0/b/gitbook-x-prod.appspot.com/o/spaces%2F-MZ6_HQ5Xb4p3DicjdT3%2Fuploads%2FqNNRKY97rpaOfvjbRJER%2Fimage.png?alt=media&#x26;token=33bf62ad-4602-455c-ab0d-3f55e4f92a8c" alt=""><figcaption></figcaption></figure>

**Tags & List Assignment**: Set your Tags & List for the Lead Form.

**Auto-Assign Properties** (Optional): You can set any hidden properties for the lead that submit the Lead Form.

**Lead Rotator Assignment** (Optional): You can set the lead to rotate among your team member and set the percentage for each team member.

2. After done set all the details, click **Save Lead Settings**.

<figure><img src="https://837980260-files.gitbook.io/~/files/v0/b/gitbook-x-prod.appspot.com/o/spaces%2F-MZ6_HQ5Xb4p3DicjdT3%2Fuploads%2F0wRrQsccH8dzs3rbI0T7%2Fimage.png?alt=media&#x26;token=815124d8-46d9-4033-a78e-1c5450a999c4" alt=""><figcaption></figcaption></figure>

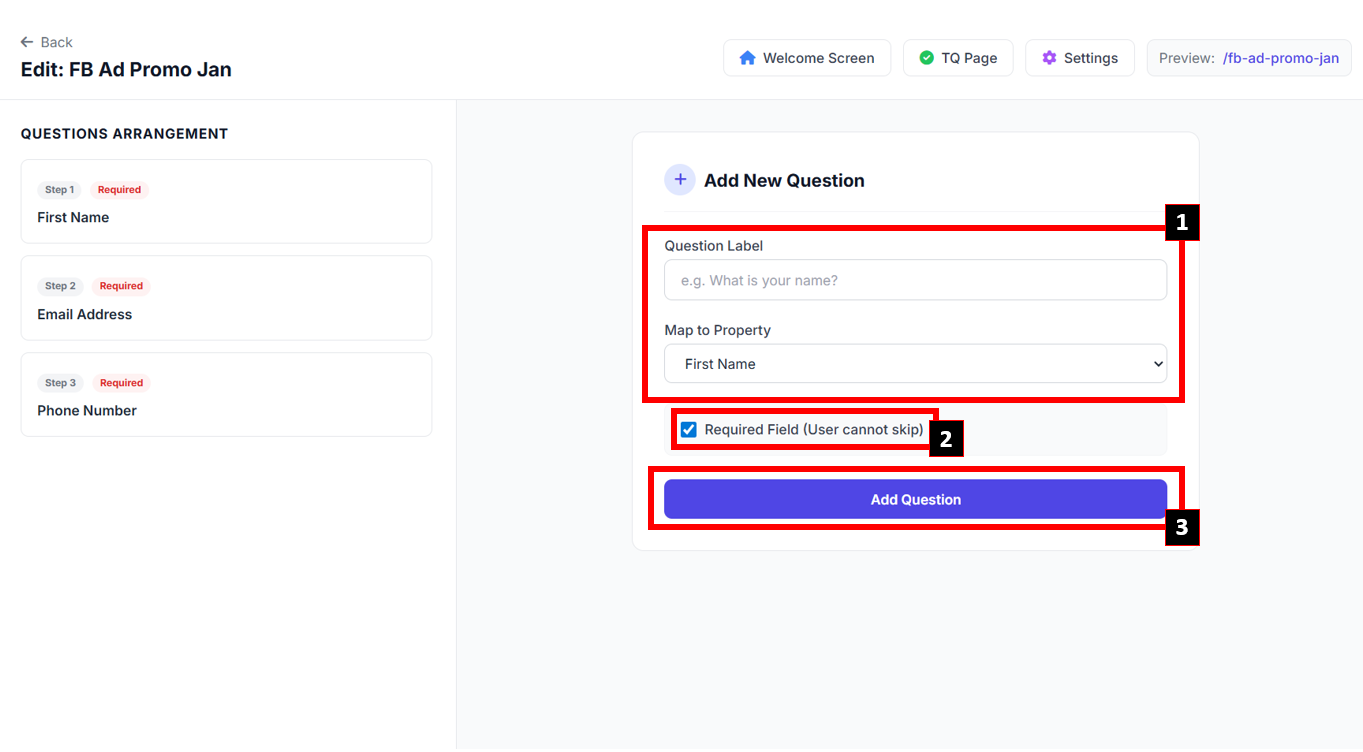
#### iv. Add New Question

1. You can add the question for the Lead Form by add the **Label** and the **Property**.
2. You can tick/untick the Required Field.
3. Click **Add Question** button.

<figure><img src="https://837980260-files.gitbook.io/~/files/v0/b/gitbook-x-prod.appspot.com/o/spaces%2F-MZ6_HQ5Xb4p3DicjdT3%2Fuploads%2FJHVtqxt9TXLJR7RZDTT9%2Fimage.png?alt=media&#x26;token=1db0eb01-49ce-4471-ac3a-11126972d1b5" alt=""><figcaption></figcaption></figure>

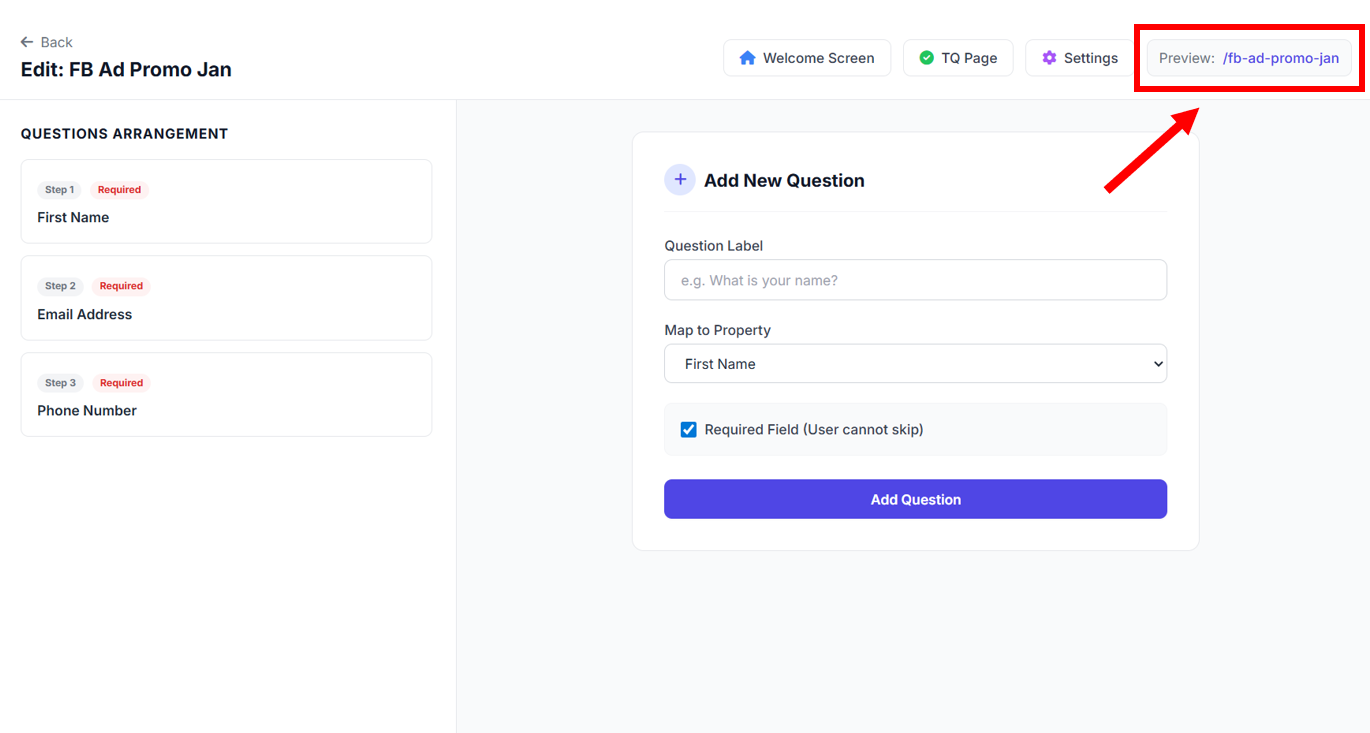
{% hint style="success" %}
After done setup all the details, you can preview the Lead Form by clicking the link at the Preview part.
{% endhint %}

<figure><img src="https://837980260-files.gitbook.io/~/files/v0/b/gitbook-x-prod.appspot.com/o/spaces%2F-MZ6_HQ5Xb4p3DicjdT3%2Fuploads%2FnDRbCZDSaHqZ0rLXH19u%2Fimage.png?alt=media&#x26;token=3d130345-f048-41b9-85c0-7e2317d7dae5" alt=""><figcaption></figcaption></figure>
